Connect the Web Portal
Introduction
Web Portal allows you to create collections of files to share them with others. These collections are called shares. The creator and owner of a share is the only one that has the ability to edit or delete the share, or to update the list of its files. The owner can also invite other users to it or restrict the access.
Invited users can only view and download the files within the share, without having the ability to edit the shared content.
Shares can't just be created manually but also automatically by a PLOSSYS 4 printer.
Web Portal functionality also includes optional email notifications when a share gets contributed or accessed. These notifications can be disabled on a share-by-share basis. Email integration is optional for the Web Portal. If it isn't configured the Web Portal will not send emails.
Keycloak Configuration
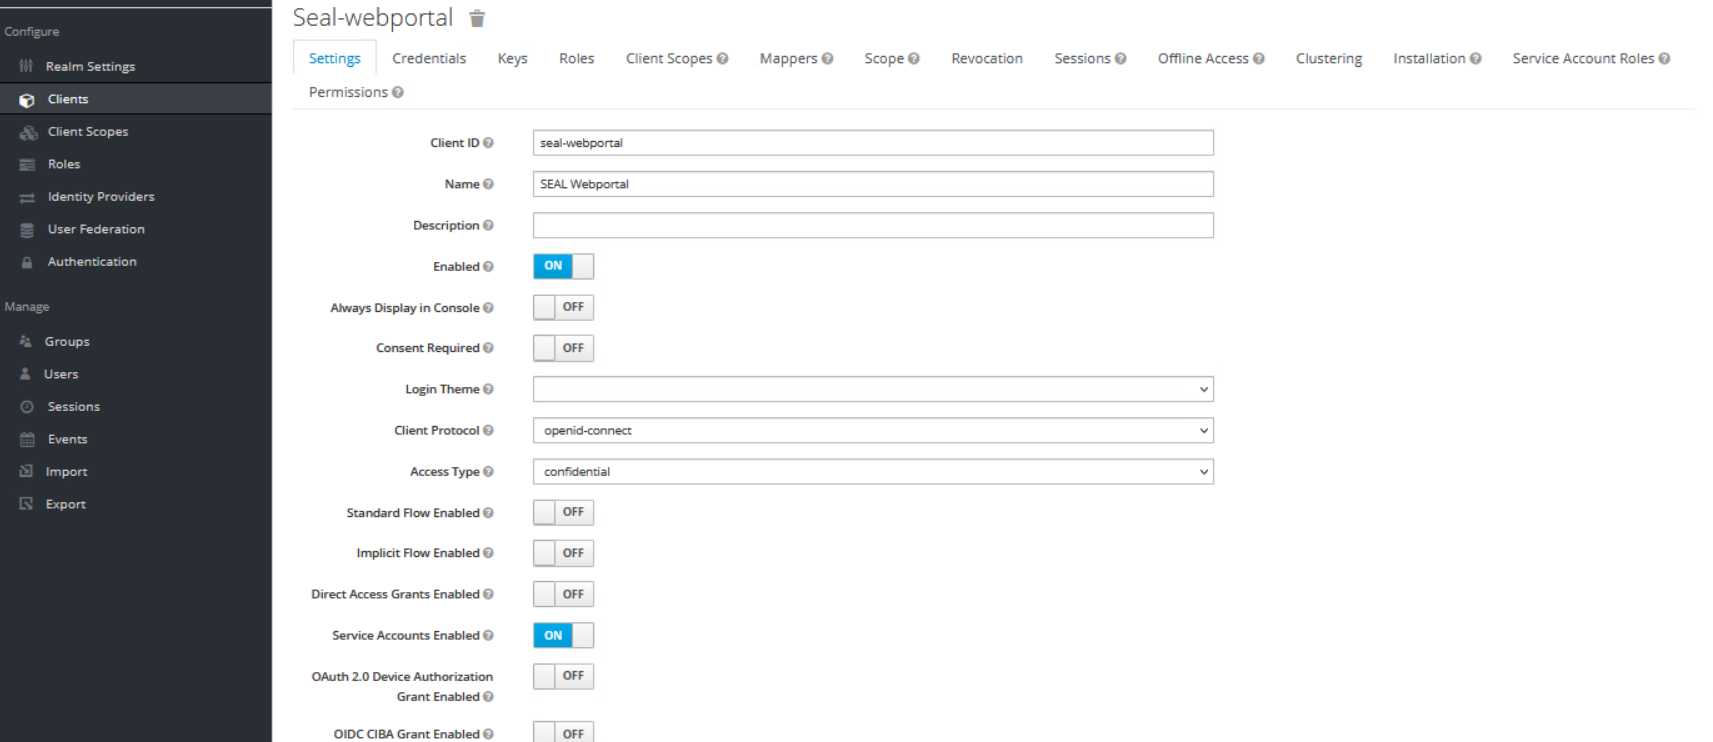
SEAL Keycloak installation comes with a preconfigured client named seal-webportal for SEAL Web Portal. Copy the WEBPORTAL_CLIENT_SECRET from the credentials tab and continue with configuring the Web Portal connector.
If you are using an already existent Keycloak, execute the following steps to add the needed client and obtain the client secret:
-
Open Keycloak. Create a new client with the following settings:
-
client id: seal-webportal -
Access-Type: confidential -
Standard Flow Enabled: OFF -
Implicit Flow Enabled: OFF -
Direct Access Grants Enabled: OFF -
Service Accounts Enabled: ON
-
-
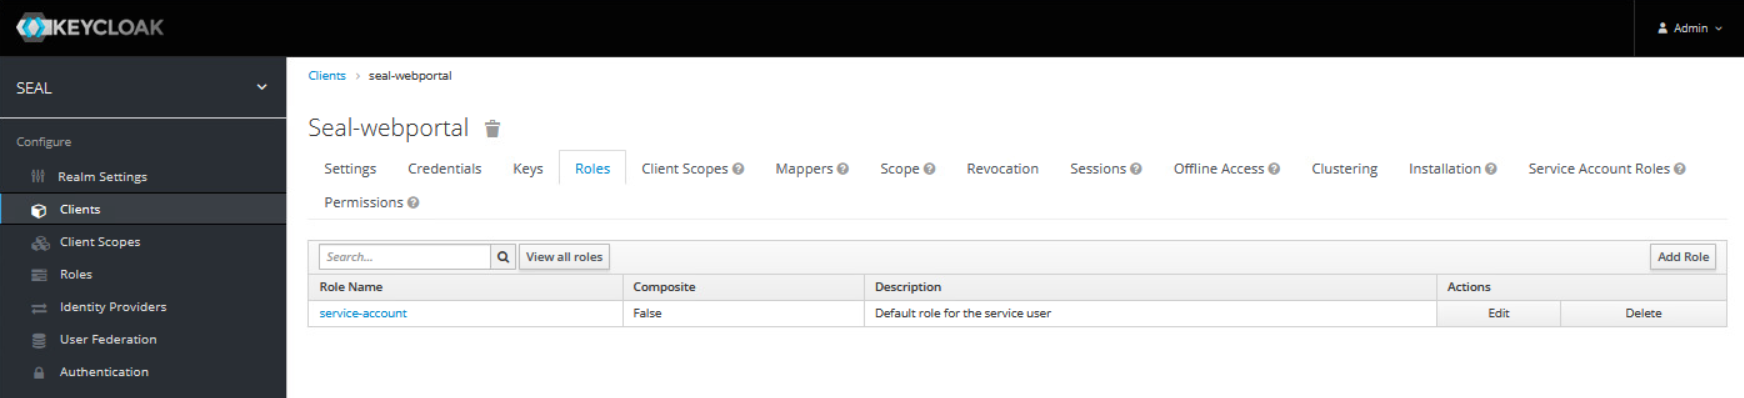
In the
Rolestab for the client add a new role with the following values:-
name: service-account -
description: Default role for the service user

-
-
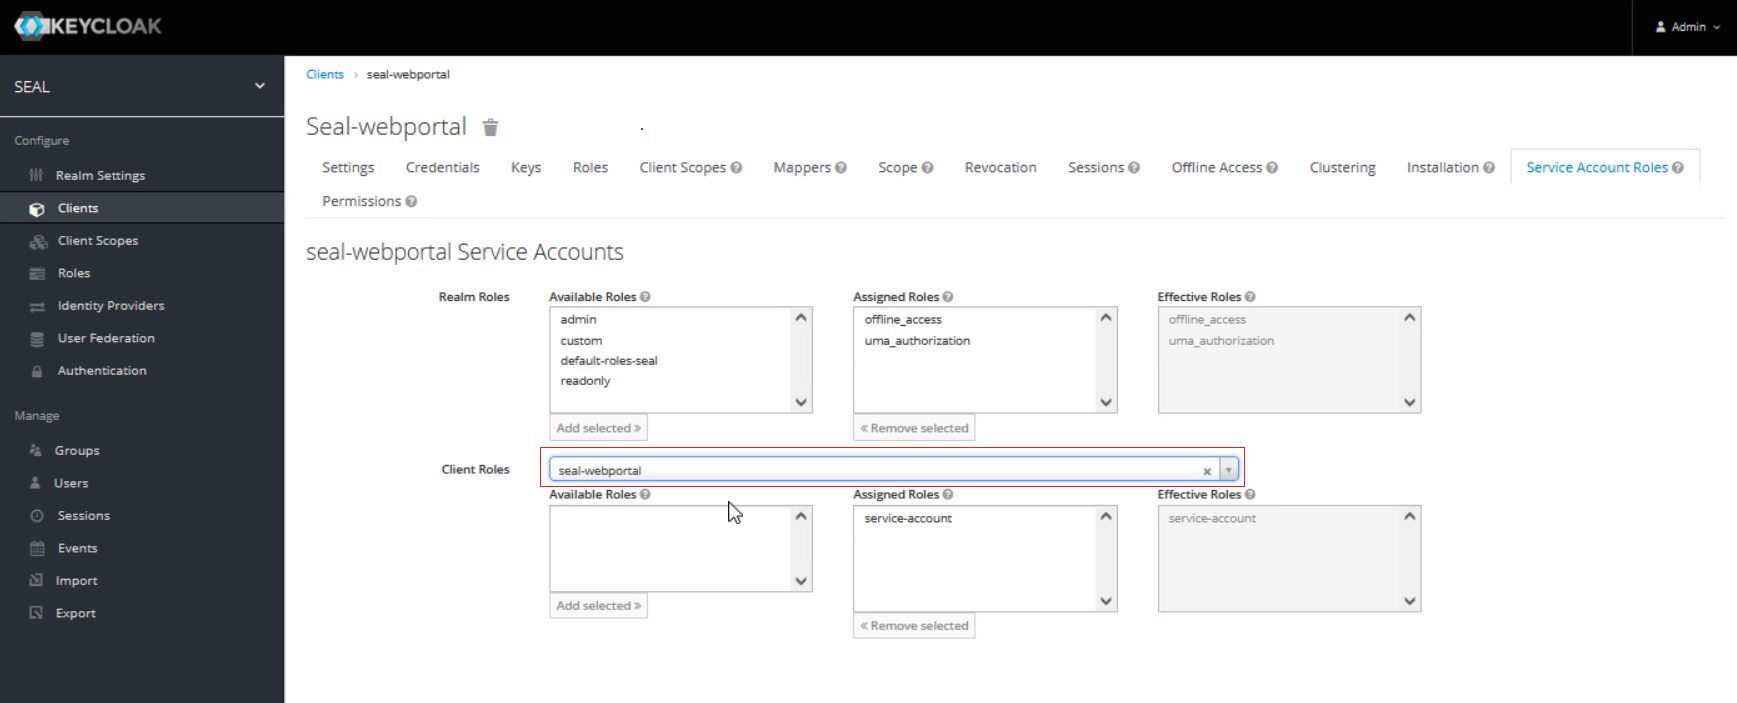
Go to the
Service Account Rolestab and add the followingClient Roles:-
seal-webportal > service-account- used byALLOWED_OIDC_CLIENTS -
realm-management > view-users- used to convert user emails to keycloak uuids
-
-
In the
Mapperstab use theAdd Builtinbutton and activate the built-inclient roles.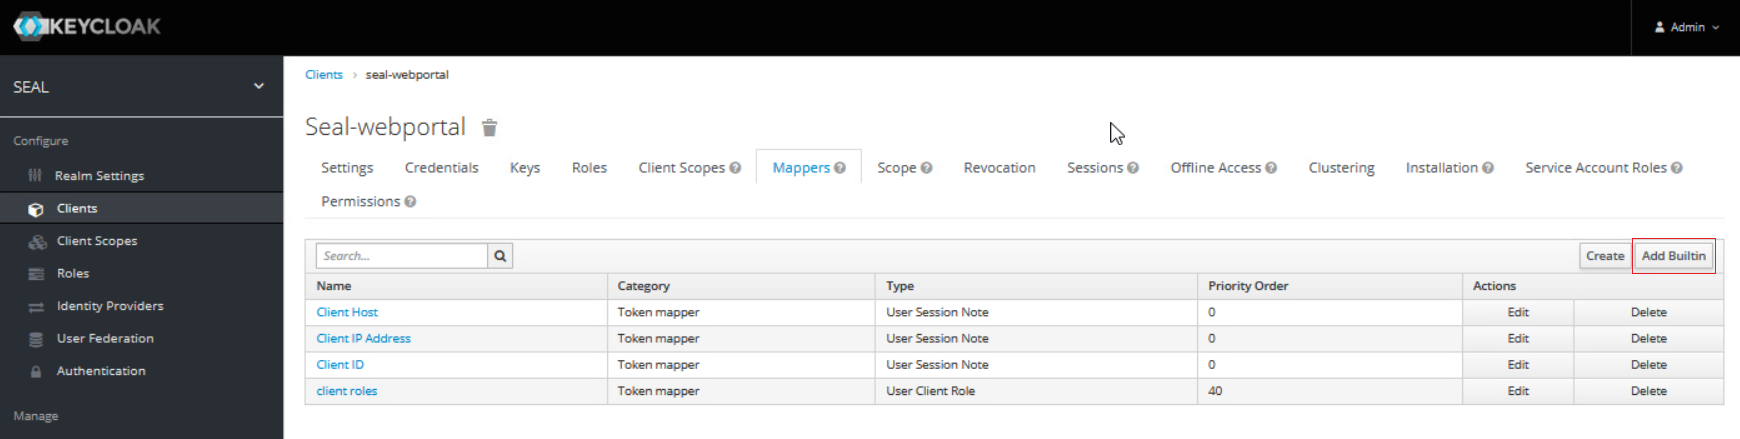
-
Copy the client secret for the
seal-webportalclient from the credentials tab. You will need it to configure the Web Portal connector next.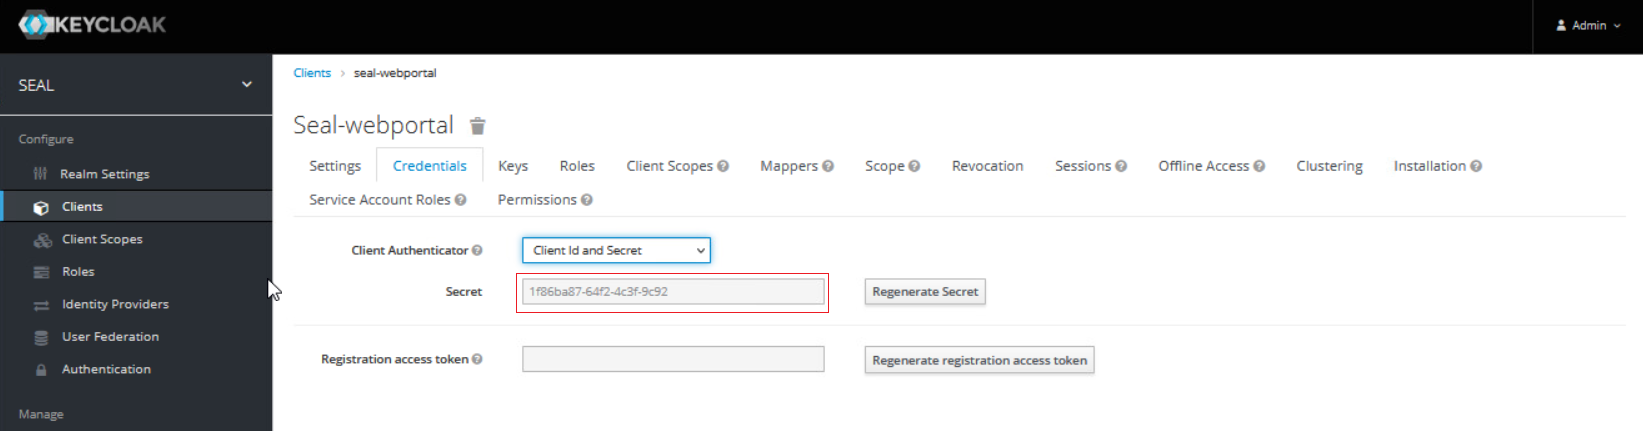
Configure the Connector
In SEAL Operator, activate the connector and specify the keys for the connection:
-
Open a Command Prompt or PowerShell.
-
Export the complete configuration of SEAL Operator from Consul to a YAML file with the following command. So you're making sure the current configuration settings are being used.
operator config export <filename>.yml --insecure -
Edit the exported file
<filename>.yml. -
In the section of the Web Portal (
webportal) connector, setcstatustoon.operator: connectors: ... webportal: cstatus: 'on' serviceName: operator-webportal url: 'https://localhost:3019' ... -
In the
envsection, specify the following keys for theoperator-webportalservice:-
AUTH_PROVIDER: Type of authentification provider, eithergenericorkeycloak -
KC_ADMIN_BASE_URL: Keycloak auth endpoint URL ifkeycloakis specified asAUTH_PROVIDER -
KC_ADMIN_TARGET_REALM: Keycloak realm name ifkeycloakis specified asAUTH_PROVIDER -
MONGO_SERVER_URL: URL of the MongoDB -
OPERATOR_SERVER_URL: URL of the Operator server -
SERVICE_NAME: Name of the service, e.g.operator-webportal -
SERVICE_TAGS: Tags for the service, e.g. connector -
STORAGE_SERVICE_NAME: Name of the service that will store the entries with their associated content -
WEBPORTAL_CLIENT_ID: Client Id for retrieving access tokens as defined in Keycloak, e.g.seal-webportal -
WEBPORTAL_CLIENT_SECRET: Client secret for retrieving access tokens for the filestore as defined in Keycloak
env:
  service:
  ...
    operator-webportal:
      tag:
        any:
          AUTH_PROVIDER: keycloak
          KC_ADMIN_BASE_URL: https://localhost:32769/auth
          KC_ADMIN_TARGET_REALM: SEAL
          LOG_LEVEL: debug
          MONGO_SERVER_URL: mongodb://localhost:27017/operator-webportal
          OPERATOR_SERVER_URL: https://localhost:3008
          STORAGE_SERVICE_NAME: operator-fileupload
          WEBPORTAL_CLIENT_ID: seal-webportal
          WEBPORTAL_CLIENT_SECRET: 1f86ba87-64f2-4c3f-9c92-bbd5befdf6f7
  ...
Literature - keys
For further information about available keys, refer to the Key Reference.
-
-
Save the
<filename>.ymlfile and re-import it to Consul.operator config import <filename>.yml --insecure
Enable Public Link Access to Shares (Optional)
By default, access to shares created is limited to users of the OIDC. If you want to enable the reading access to anyone with the link, execute the following steps.
-
Open a Command Prompt or PowerShell.
-
Export the complete configuration of SEAL Operator from Consul to a YAML file with the following command. So you're making sure the current configuration settings are being used.
operator config export <filename>.yml --insecure -
Edit the exported file
<filename>.yml. -
In the
envsection, specify the following keys foroperator-webportalservice:-
ALLOW_SHARED_ENTRIES: Specifies if public Web Portal shares are enabled. Set it totrue. -
UI_BASE_URL: URL of the Web Portal UI. Only necessary if theshareLinkplaceholder is used in an email template and the automatic detection of this URL is prone to fail (e.g. when shares are created through a batch process).
env: service: ... operator-webportal: tag: any: ALLOW_SHARED_ENTRIES: true UI_BASE_URL: https://myserver.com:3000 ... -
-
In the
envsection, specify the keyPUBLIC_SERVICESforoperator-serverservice. Set its value to'operator-webportal'. If the key already contains a value, extend it. The key accepts comma-separated string values.env: service: ... operator-server: tag: any: PUBLIC_SERVICES: 'operator-webportal' ... -
Save the
<filename>.ymlfile and re-import it to Consul.operator config import <filename>.yml --insecure
Setup Email Service (Optional)
Web Portal supports email notifications, that get sent through the seal-email-service. Users will get an email when they get access to a new share, or when someone accesses a share that they own.
Notifications can be disabled on a per share basis, via the WebPortal panel inside the Operator UI.
To enable this functionality you need to specify the mail server in the email-service settings:
-
Open a Command Prompt or PowerShell.
-
Export the complete configuration of SEAL Operator from Consul to a YAML file with the following command. So you're making sure the current configuration settings are being used.
operator config export <filename>.yml --insecure -
Edit the exported file
<filename>.yml. -
In the
envsection, specify the following keys for theemail-serviceservice:EMAIL_FROM: Sender email addressSMTP_PASSWORD: Password for the SMTP user specified inSMTP_USERNAMESMTP_PORT: Port of the SMTP serverSMTP_SERVER: SMTP server nameSMTP_USERNAME: SMTP user name
env: service: ... email-service: tag: any: EMAIL_FROM: webportal@firma.de SMTP_PASSWORD: <smtp_password> SMTP_PORT: 25 SMTP_SERVER: 192.17.17.18 SMTP_USERNAME: webportal@firma.de ... -
In the
envsection, specify the following keys for theoperator-webportalservice:-
SHARE_ACCESSED_HTML: HTML of the email sent to the owner of a share when it gets accessed by an assigned user for the first time. -
SHARE_ACCESSED_SUBJECT: Subject of the notification email to be sent when a share gets accessed for the first time by an assigned user. -
SHARE_ACCESSED_TEXT: Text of the email sent to the owner of a share when it gets accessed by an assigned user for the first time. -
SHARE_ASSIGNED_HTML: HTML of the notification email sent to the assigned user(s) of a share. -
SHARE_ASSIGNED_SUBJECT: Subject of the notification sent to the assigned user(s) of a share. -
SHARE_ASSIGNED_TEXT: Plain text of the notification email sent to the assigned user(s) of a share.
Hint - usage of placeholders
The following placeholders are available:
-
{expirationDate}: Expiration date of the share. Only available forSHARE_ASSIGNED_HTMLandSHARE_ASSIGNED_TEXT. -
{shareId}: ID of the share. For the structure of public and private links refer to the examples forSHARE_ASSIGNED_TEXTat the key reference. If both, public and private links to shares should be sent, it is adviced to use the{shareLink}placeholder instead. -
{shareLink}: Automatically generated link to the share. Depending on whether the share is private or public either a private or a public link will be generated. -
{shareName}: Name of the share given by the creator of the share. -
{userName}: Name of the user who accessed the share. ForgenerictypeAUTH_PROVIDERthe user's name isn't available. The user's email will be inserted instead. Only available forSHARE_ACCESSED_HTMLandSHARE_ACCESSED_TEXT.
env: service: ... operator-webportal: tag: any: SHARE_ASSIGNED_SUBJECT: 'Share assigned' SHARE_ASSIGNED_TEXT: 'Hello! You received access to share: "{shareName}". You can access it via this link: {shareLink}.' SHARE_ASSIGNED_HTML: '<h1>Hello!</h1> <div><p>You received access to share: <b>{shareName}</b>.</p> <p>You can access it via this link: {shareLink}.</p></div>' EMAIL_SERVICE_URL: https://localhost:3030/v1 SHARE_ACCESSED_SUBJECT: 'Share accessed!' SHARE_ACCESSED_TEXT: 'Hello! {userName} accessed the share: "{shareName}". You can access the share via this link: {shareLink}.' SHARE_ACCESSED_HTML: '<h1>Hello!</h1> <div><p>{userName} accessed the share: <b>{shareName}</b>.</p> <p>You can access the share via this link: {shareLink}</p></div>' ... -
-
Save the
<filename>.ymlfile and re-import it to Consul.operator config import <filename>.yml --insecure
Create Shares
Shares can be created manually in the Web Portal panel of the user interface.
Additionally, in PLOSSYS 4, you can output documents directly to an on-the-fly created Web Portal share.
For detailed instructions, refer to Create Web Portal Shares.